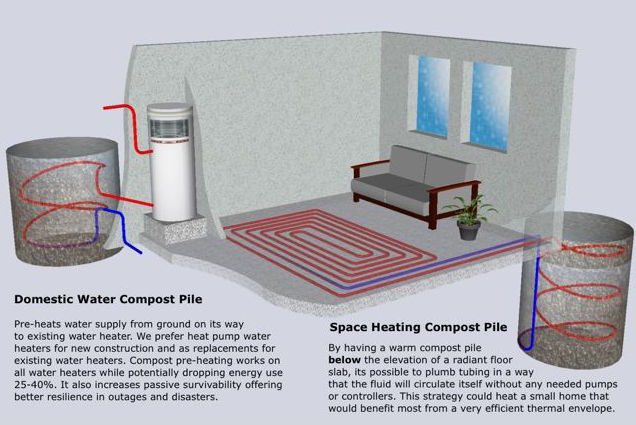
Heating water is expensive and comes with many hidden environmental and societal costs. For growers, gardeners and residents passionate about their landscape, compost water heating measurably decreases these costs and substantially increases quantities of composted organic matter for a universe of soil fertility benefits. This is an illustration of my domestic compost water heating system and proposed space heating method with compost.
Do you want your dirty energy water heater use contributing to this?


Or compost water heating doing more of this?


As I compose this post, a horde of thermophilic bacteria is decomposing my big pile of coffee grounds into lusciously rich compost while reducing the financial and environmental costs of heating water. Few households make sense for the maintenance involved, but compost is arguably among the healthiest, most cost-effective ways to heat water.
- Businesses and taxpayers reduce waste removal costs, lowering transportation pollution.
- Landscape and garden owners buy less amendments, heavy with transportation costs. Increased local food production reduces transportation, water and food costs. More fertile soils, better absorb stormwater.
- Smaller energy bills, good exercise, more time outdoors, collecting material results in more community interaction.
- Compost heated water reduces impacts of our main dirty energies like nuclear, coal and natural gas. As with solar, energy is produced on site which reduces transmission losses. Saving energy saves water.
25% – 50% less energy costs and environmental damage for investment of $300
I reduced my water heating costs 25-40% with compost in heating mode for an investment of $300 in materials. Performance might be improved with different compost ingredients. Costs may be reduced to nothing with other system parts. Labor is hard to figure but for those with minor plumbing skills, it’s an easy project with the right site and situation.
Lower fruit exists for those interested in reducing domestic water heating impacts and costs. Reducing consumption along with other measures can be more important than compost water heating. Consider replacing existing water heater with Heat Pump Water Heaters HPWH in most climates, especially in basements or properly built (unvented) crawlspaces. HPWH reduce cooling needs, potentially benefiting indoor air quality with dehumidification and less indoor combustion appliance risk. Our cost-effective water conservation post explores typical hot water consumption and how showerheads, efficient appliances, drain waste heat recovery, and on-demand circulation offer fast simple paybacks.
It’s unlikely that tying compost water heaters directly into home plumbing systems, as I have, will be allowed in building codes anytime soon. The main concerns are lack of maintenance, leaks, penetrations in the building envelope, or having the compost pile contaminate the plumbing system. I think it’s easy and very safe but there is plenty of opportunity for error when tackling a home-integrated project half heartedly and expect to deconstruct the system at resale.
A potentially more code compliant use of compost heated water could try the radiant floors from my illustration or boost temperatures in the heat exchangers of HRVs or ERVs providing outdoor air ventilation. Efficient homes have low heat requirements and I think a modest size compost water heater could supply most of the demand for a small, high performance home. I hope to try it some day and would love for someone to beat me to it and share some results.
Compost Recipes for Heating Water
Even if not heating water, making quality compost can be worth the effort. There seems to be conflicting information regarding hot compost, even from trustworthy sources. The many variables include size of pile, particle size, moisture content, airflow, outdoor temperatures and ingredients with their respective Carbon to Nitrogen ratios (C:N). Most composters are interested in the hottest temperatures and fastest time to finished compost, which lends itself to turning or mixing the pile. This may not be the best fit for compost water heaters unless you don’t mind rebuilding the pile multiple times per year. I aim to build only two (preferably one) compost piles per year with no turning or mixing which minimizes maintenance. Warm might be better than hot, which extends time between rebuilding piles. Of course long lasting hot temperatures would be even better.


Most East Coast residents have access to two of the best compost ingredients available. In autumn, bagged leaves pile up on suburban curbs, free for the taking. Starbucks and most coffee shops will put out bags of used coffee grounds for composters. Leaves are considered carbon and coffee, a nitrogen-rich green. I find these two ingredients combined or by themselves are perfect for warm to hot temperatures and dynamic compost.
Any plant or animal material in the right combination, consistency, and moisture content can be used to generate warm temperatures to heat water. Grass clippings get hot but burn out fast and are hard to get in enough quantity. Woody material is worth trying and I think straw, sawdust and wood shavings have more potential with their small particle sizes. Woodchips are plentiful but might need a bigger pile. The woodiest materials will probably benefit from added Nitrogen to get warmer and watering the pile with urine, fish emulsion or manure should do the trick if there are no greens on hand to mix in. I feel the importance of C:N ratios are generally overblown. With a right size pile, fresh ingredients and the right amount of moisture, warm temperatures are achievable with most potential materials.
Compost Water Heater Construction
Top goals for my project included low upfront costs, keeping the pile reasonably small, and minimum maintenance. I think I struck a good balance but encourage others to improve, measure and share their experiences for others to benefit. The variations worth tinkering with seem to be tubing length, insulation and compost details. This technology could use much more experimentation and documentation for potential of better results with less input.
My system is new and still figuring it out, mainly achieving good performance through Asheville’s winter. I’m currently on my second pile, this one built entirely from used coffee grounds from our local Starbucks. It was built late November 2015 and unlike coffee piles of the past, stayed cold through the winter. In the future I will reduce added moisture during the build, insulate the pile, and expect to double the water temperature from the ground through the winter months.
The current pile began heating when the weather warmed in March. The first half of May averaged 88°F water emerging from the compost pile on its way to the existing water heater. The compost pile is currently adding more than 30°F to the 55°F water from the ground, and the existing water heater is using maybe half of the dirty energy to achieve 112°F.
My first compost water heater pile

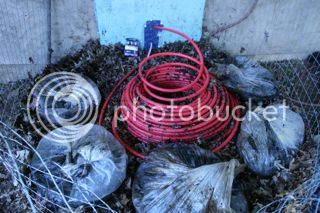
The account below is taken and edited from this permaculture forum thread, documenting my first compost water heater pile and the measured reductions in existing water heater consumption by a dedicated electric meter. This pile’s ingredients, roughly 70% neighborhood leaves and 30% used coffee grounds have given me years of warm to hot compost. Leaving materials bagged and protected from moisture until building the pile, keeps them fresher.
Most sites and situations are not nearly as good as mine. I compost in the backyard, downhill from my driveway and against the masonry wall of a walkout basement which contains the existing water heater. Most of the garden, brambles and micro-orchard is also downhill from here.
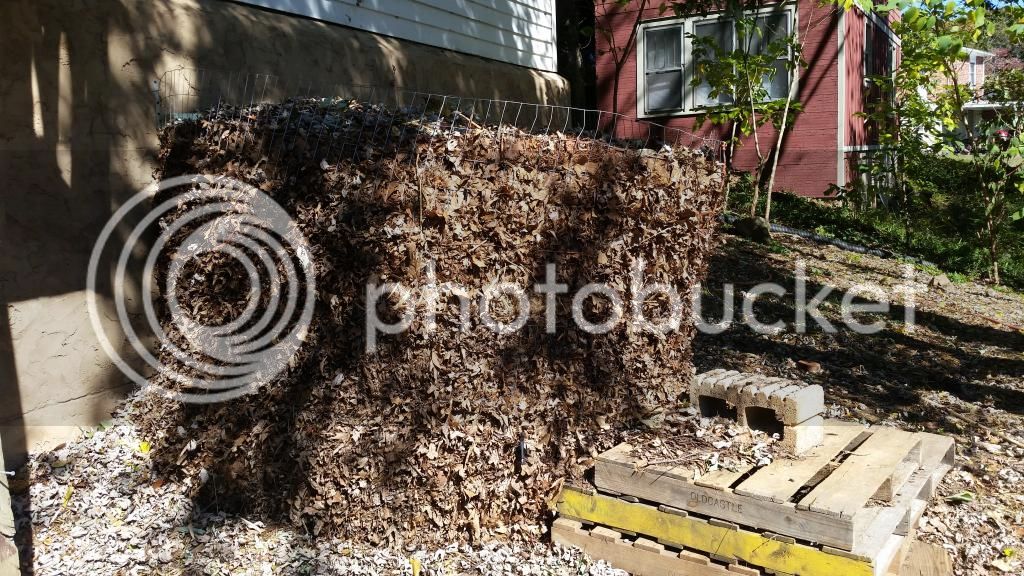
This is the compost water heater pile against my foundation wall, opposite the existing water heater in the basement, the closer the better. This makes a short plumbing run, protects tubing from freezing temperatures and eliminates underground tubing and vulnerable pipe insulation. The pile’s diameter is roughly six feet, same as the fence height though it might only be five feet tall with stretching and settlement. I bought cheap fencing and the welds are breaking so better to invest in something stronger here. Hog fence panels are another option and may be easier to insulate with strawbales through squaring the pile, but a circular pile better matches the tubing coil, a more efficient use of material.
Some composters make strawbales the supporting structure which is appealing because of integrated insulation. My plan for insulating the winter pile of 2016 and 2017 is to wrap the pile in scrap plastic, circle another fence around the first, three to five feet bigger in diameter and compact the resulting ring with bagged dry leaves, covering it all up with a tarp and hopefully some used burlap for aesthetics. The lid is most important and will cobble together scrap XPS foam and plastic unless something better appears. While strawbales will probably serve other needs after their life as insulation, I doubt walls are cost-effective for our climate but a strawbale roof has potential for a simple payback.
The compost heater’s foundation is scrap plastic roofing underlayment on top of scrap 2″ XPS foam board. Compost pile bottoms are usually cold so only a well-lapped plastic membrane is needed. While unlikely with good PEX practices and maintenance, having the plastic bottom slope and drain to a noticeable area can reveal potential leaks.
My compost lie at the feet of a giant, silver-leaf maple, tenacious predator despite plastic put down in defense. As compost settles past the plastic, roots invade rudely impeding the bounty harvest. Build piles to good moisture contents upfront and protect from rain to help.

The fence is attached to the ~1″ thick stucco with aluminum termination bars and tapcon fasteners. The finish grade slopes quickly from the basement wall, causing weight of the pile to pull on this attachment so I was careful stomping the pile, forcing out the sides instead of the downhill access, for a better circle and less weight pulling at the wall attachment. So far so good.
For separation from the wall, I used scrap 2″ XPS left over from insulating my basement. Probably not needed for thermal reasons but will be glad it’s there come insulating months. For a wood framed wall, I would try to build a separate wall for the compost to go against, with an airspace between compost wall and house wall.
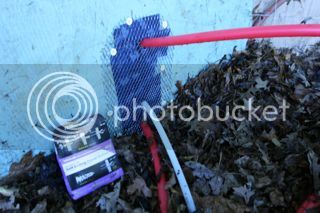
Rodents love warmth and would gladly follow the tubing into the home. Behind the foam board is another layer of hardware cloth, well detailed against the stucco and tubing to keep out tunneling critters.
Penetrations in the building envelope are tightly sealed. Working with spare materials from exterior to interior: high performance building tapes, quality urethane sealant, steel wool for redundant critter proofing, and metal roofing butyl tape. Ignore the white pex, meant to house a temperature probe. It’s best to measure the water temperature from the pile and I recently ordered a 36″ compost thermometer in hopes of improving my skills.
I built the pile up 18″-2′ before beginning to bury the tubing. This shows how much coffee I was adding to my carbon source of neighborhood leaves. I rarely turn my compost and with this type of compost water heater, forget about it. I dump 2-3′ of leaves, wet them down, walk them in to 4-8″ and pour on the coffee grounds. Tease them in by hand trying to eliminate clumps and distribute the grounds as best as possible in that layer. Slightly wet and repeat.
With shorter tubing lengths, I would build the pile up 2.5 to 3.5 feet before starting to bury the tubing, keeping it towards the top of the pile. Good insulation should keep this area warm for the life of the pile.
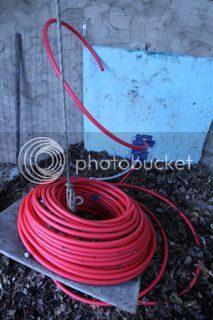
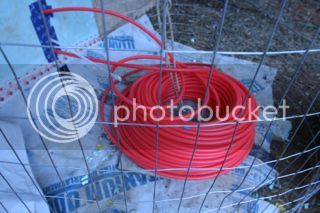
I thought I could lay the coil without using joints or fittings outside, but quickly realized cutting it would work best for evenly distributing the tubing. Of the many nice things about PEX, couplings are cheap and easy. This picture shows my hanging spool technique. Out of pure luck, that pesky maple has a branch right above the pile. From my roof, I easily rigged a pulley, rope and piece of plywood turning a bitter part of the system much sweeter.
500 feet of 3/4″ PEX was my tubing selection and is somewhat heavy, even without water in it. Hanging the coil of tubing allows plenty of headroom for working the compost layers and pulling out slack between layers, raising the coil up as the pile grows in height. Without tree branches available, I would rig a teepee or beam for the hanging spool considering it’s use to the operation.
When compost goes cold after six months, the hanging spool is used to recoil the tubing as finished compost is harvested and a fresh pile is built.
![[IMG]](https://www.greenbuilt.org/wp-content/uploads/2023/05/IMG_2952.jpg)
I’m happy with 3/4″ diameter. It didn’t effect my water pressure and has affordable fittings easily compatible to existing plumbing systems. I might try 1″ but not 1/2″ PEX. Most compost water heaters seem to use PE tubing but PEX is my preferred choice for more reliable fittings, better pitchfork and kink resistance. 500′ provides around nine gallons of storage and heat transfer area within the compost pile. Performance may drop going shorter but 300′ or 150′ might provide satisfactory results with a low flow showerhead. I might choose 300′ doing it again for less tubing material costs and maintenance labor.
Between each described layer, I pull 4-6 loops off the coil and create this flower shape, first securing with sod staples and later using old straw twine to tie stubborn, tighter inner layers of the spool to the fence. I tried to keep the tube 8-12″ away from the exterior of the pile.
Most of the work involved with my compost water heater, is needed to build a regular, no-turn compost pile. The tubing adds some fuss but doesn’t add too much time or effort, mainly thanks to the mobility of the hanging spool.
Compost Water Heater Home Plumbing Integration
![[IMG]](https://www.greenbuilt.org/wp-content/uploads/2023/05/IMG_3253.jpg)
This is the other side of the basement wall, opposite compost pile. I added an expansion tank, as I thought my plumbing system needed more capacity anyway. This is a good idea for tubing lengths 300′ and up but may not be necessary for smaller tubing lengths or plumbing systems with plenty of expansion tank capacity. It’s costly at ~$40 but makes for a healthy addition to most domestic hot water systems.
I thought the hose bibb at the bottom supply leg would be helpful for draining the tubing, but I didn’t siphon it all out at rebuild and managed the extra weight just fine with the hanging spool.
Avoid 90 degree fittings to prevent loss of water pressure. Those 90 degree pipe bend support pieces are handy for tightening up PEX turns without adding hard turn fittings.
![[IMG]](https://www.greenbuilt.org/wp-content/uploads/2023/05/IMG_3248.jpg)
The existing water heater tank is about 6′ from the exterior wall and here the tubing travels overhead. Ball valves avoid in-line pressure losses and are used to measure temperatures and isolate the compost water heater side for possible maintenance like fixing leaks caused by overly sharp pitchforks. I punctured the tubing early in first rebuild, which was immediately obvious with tubing still pressurized.
A four tine pitchfork with grinded points fixed the issue.
Pressurize compost tubing, checking for leaks before burying and ensure the pile’s plastic bottom drains to a noticeable location.
The top hose bibb was intended to allow air in for proper draining of the tubing system from previous bottom hose bibb but is most important for measuring the water temperature on the way to the existing water heater.
![[IMG]](https://www.greenbuilt.org/wp-content/uploads/2023/05/IMG_2966.jpg)
Here is the existing water heater’s top, pre-compost plumbing integration. This Rheem Marathon is an electric resistance tank with good insulation and features a no-anode rod design. The maintenance of anode rods are a common homeowner neglection, killing most water heaters prematurely. I love this water heater, installed years ago to replace a previous leaking appliance (anode rod). I wish I could have waited for the now widely available heat pump water heaters HPWH. Being a NC resident, most of the energy supplying this water heater is from mountaintop removal mined coal combustion. A HPWH would be reducing the impacts of my backup water heating and basement dehumidification costs.
The gray polybutyl pipe is from the ground of the city water, as it supplied the dip tube or tank bottom with 40-60°F cold water before the compost water heater was installed. Notice the typical hard turn 90 degree fitting before expansion tank.
![[IMG]](https://www.greenbuilt.org/wp-content/uploads/2023/05/IMG_3246.jpg)
With compost water heater integration, the water takes a detour through the compost pile with a tee and returns with another. It’s hard to see but there is another ball valve between the two legs in the down/stopped position. If compost tubing needs repair or change, this ball valve is opened up and the other two previous are closed, keeping the existing water heater operational with work to the compost water heater side. Changing the previous 90 degree fitting and gray pipe to PEX with a sweeping 90 degree pipe bend support, kept total 90 degree hard turns (the tees) to only one extra.
Under Pressure
There is a noticeable difference in pressure filling the tub, but not at sinks or shower. Less pressure tends to reduce hot water consumption but the Vitamin C Sonaki and Sprite shower filters reduce plenty already, down to 3/4 Gallons Per Minute GPM at last measurement, well below the 2.5 GPM mark, best public service restriction in past 20 years.
Shower heads are a primary variable in compost water heater performance as with all water heaters and their resulting energy costs and consequences. I take showers like an irresponsible teenager and it’s nice to know that even without compost pre-heating, my long shower times are partially offset by the low flows. The pressure seems fine to me with a rain head and bigger size water droplets. Having the fixture inches above my head seems to make all the difference in achieving satisfying showers with such low flow. This suggests that shower heads that adjust to a user’s height is a good investment for comfort and simple paybacks. Low flow showerheads perform better when positioned closer to the user.
Plastic World
I’m extremely sensitive to chemical smells and can detect the new PEX in my hot water, another reason to try shorter tubing. The warmer the water and longer it sits, the more smell of plastic, though guests don’t notice when asked. Sometimes I flush the top of the pile’s tubing, after periods of non use or when checking temperatures. Smell is fading in year two. Other tubing or parts might be safer but it’s tough to beat the availability, labor, and reliability of direct exchange PEX. Certain heat exchangers could drop the concerns with a sacrifice in upfront costs and efficiency.
I feel the added PEX is safe for showering. Chlorine and chloramine in public water might deserve more attention. Neighbors showering in well water, risk fracking pollution, which compost and less Natural Gas usage addresses. I’m more concerned with the plastic-smelling, Trader Joe’s frozen berries in my daily smoothies. Washing fine, eating bad. Ironically, PEX is helping replace those berries for some less plasticy and more locally produced, in my backyard.
Many interested in natural building wear emotional blinders to all chemicals and modern technology but this is an example of how plastic and newer technologies like compost water heating and Heat Pump Water Heaters HPWHs, can be very beneficial to the environment and society.
Measuring existing electric water heater consumption with dedicated sub-meter.
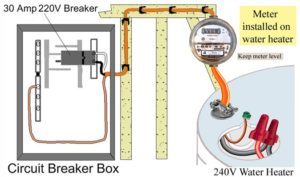
For measurements of existing water heater energy usage, I leaned on WaterHeaterTimer.org installing a sub-meter. A great source on typical water heaters, installation, maintenance and potential for energy savings.
I made pre-compost measurements for only eight months from February to September. For more accurate pre-renewable energy measurements, a full year or two of results is better. The measured average was 131 kWh per month, too low for a year-round monthly average that included the entire summer but not entire winter when energy usage is higher due to colder water from the ground of city supply and longer, hotter showers.
Pre-compost:
Feb: 160 kWh Mar: 151
April: 190
May: 164
June: 107
July: 74
August: 89
Sept: 113
Pre-compost actual measurements are summer weighted with an average of 131 kWh.
With compost water heater installation:
Oct: 65
Nov: 126
Dec: 109
Jan: 108
The compost-influenced actual measurements average to 102 kWh per month, conservatively appearing to have lowered my mountaintop removal mined coal combustion water heating costs by ~25%. With a presumed more accurate year-round average of 160 kWh per month, the reductions would be ~40% with active compost heating the water. By replacing my existing electric resistance tank with a heat pump water heater HPWH, the combined energy savings could easily be 70-90%, not including the reduced dehumidification costs in the basement. The remaining load gets easier to serve with solar photovoltaics PV systems and results in a near-zero water heating footprint.
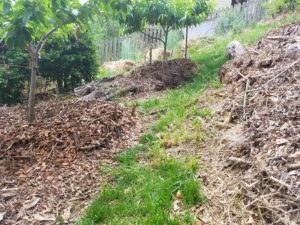
The measurements above are the first pile. I hope to do better with my current all-coffee pile and coming winter pile with insulation. I think greater than 50 percent water heating energy and environmental cost savings are possible without sacrificing bad shower habits. It’s lead to much more finished compost, creating healthier soils benefiting my vegetables, flowers, berries, fruit trees and landscaping while providing more appreciation for nature and horticulture.
Unlike most water heaters, compost water heating byproducts are highly beneficial.


Cost-effectiveness is commitment
Don’t waste time and resources on a project that won’t pay off. I suspect quick simple paybacks for those that value compost and the biannual maintenance needed to keep the tubing warm. Compost water heating systems risk being abandoned, like so many of WNC’s solar thermal systems. Unlike solar thermal, it will be easy to disassemble and reinstall on a new home if I ever move. This system’s parts are also a fraction of the upfront costs of solar thermal.
A video of the first re-build is coming soon and will do my best to post.